Oracle Autonomous Database with REST API (ORDS) in action..
- Nipun Kularathne
- May 28, 2020
- 14 min read

Hello again..
In this article we will look at how we can use an Oracle Autonomous Database (OAD) practically to store data in the cloud and how to retrieve/update/delete the data from our client applications using REST API services. We would be using Oracle provided Oracle Rest Data Services (ORDS) to achieve this.
To provision an OAD I have used the Oracle free tier which you'll be automatically eligible for when you create an Oracle cloud account.
In simple terms we are looking at how to host a database(DB) in a separate secure environment where the management of the DB is done by an automated database administration tools for us, and we are going to connect to that database using web service endpoints to perform Insert/update/delete operations using our client applications. If you go through my previous article on Oracle Autonomous Database you would understand the unique nature and benefits of using these self-managed databases.
Things we are going to cover
● Provisioning an OAD in Oracle cloud free tier
● Connecting to the OAD (using standalone oracle db administrating app)
● Creating a user and giving necessary grants to the OAD for that user to connect and create objects
● Creating a table and enable Oracle Rest data services and restrict the access to outsiders
● Configure a table-space and a user to use token-based OAuth authentication
● Generating Client Id and Client Secret for token authentication
● Test the service using the Postman client.
Provisioning an OAD in Oracle cloud free tier
The first thing we need to do is to register get a free cloud account in Oracle. For that you need to get registered in https://cloud.oracle.com. You will be asked to enter your credit card details but you will not be charged unless you choose to upgrade the account to a paid one. You can find more information on Oracle cloud free tier and getting started info using this link.
Now that you have created the free account, you have always free services offered to you by Oracle which includes 2 Oracle Autonomous databases. You can log on to your cloud account to provision an OAD according to below instructions.
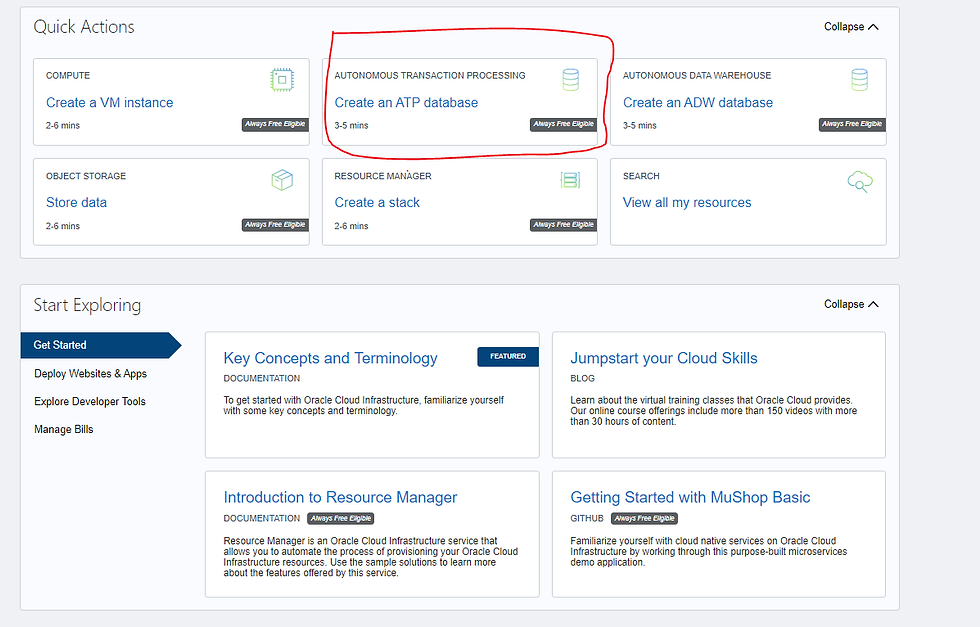
When you log in to the cloud account you will get the below dashboard where you can click on the marked Create ATP Database option. OAD has two variants to choose from depending on the workload type you are going to have on them. For now let’s choose an Autonomous Transaction Processing (ATP) database to do our job here. Other variant is the Autonomous Data Warehousing.
When you click on the marked button you will get a form fill and to choose different features of the OAD. For now let's just keep everything as it is as our objective is to create a database in the cloud and get something out of it with the minimum configurations possible. Therefore we are only interested in the Admin password field and the display name field in the provisioning form in this exercise.
You can give a meaningful name to as the display name of the database which makes it easy for you to identify the database later. And just type a strong password adhering to the requirements that displayed on the same page in red. You cannot choose a username as it is already selected as ADMIN.

After that click on the Create Autonomous Database button to order the database.

After the creation of the database you will be directed to a window where you can perform various tasks with the created Autonomous database instance.
Connecting to your database
We can use either built in Oracle Sql Developer web or a standalone Oracle Sql Developer app to connect to the database. Let’s look at how to use a standalone Oracle Sql Developer application to connect to the database from a remote machine.
Credentials file
To use Oracle Sql Developer you need to first download the credentials.zip file from your OAD. This file is an archive that holds the information of the connection and its properties for the client application to use when connecting to the database remotely. To download that click on the DB connection button on the OAD dashboard and in the dialog you get click on download. Note that you need to enter a password before downloading the file. After downloading, move the file to a location where you can access it using Oracle Sql Developer later.

Then we need to download the Oracle Sql Developer application from here. Its recommended to download the zip archive with the jdk so that you would not run into issues if you have not installed java in your machine. This relies on the jdk. After downloading, unzip the file and run the sqldeveloper.exe file to open the app.
In the application first create a connection to your oracle database hosted on the cloud. Click on the create new connection icon ( the green + mark on the left panel)

Next window enter a name for the connection and select the database type as Oracle. Keep the Role as default. Authentication type should also be default. In the username section type admin and for the password use the admin password you gave when creating the oracle autonomous database.
In the connection type section choose cloud wallet. Since we download the credentials.zip file we can use that as the cloud wallet here. For the configuration file section click on browse and locate the downloaded configuration file (credentials.zip file)
Leave other things as it is and click on the test button to see if the connection to the cloud db succeeds.
Note: You may check the save password checkbox to avoid always entering password when the connection expires and reconnecting your app to the cloud.

When you see the Success status click on the connect button and you will get your database connection established in a few seconds.
After creating the connection that will be visible on the left pane with the name you gave for the connection.

Now that we have connected to the database as the Admin user we can create other users in the database. Its not recommend use admin user's table space and privileges to create tables that are to be used with our external client applications. We create separate users with less privileges and create tables and views in those users table spaces for our client applications to use. In this way we can isolate table spaces and the applications that access those tables. Admin users normally have access to all these table spaces. Therefore for our rest data consuming applications to connect to the rest data endpoints we need to create a separate user and give that user the necessary privileges to connect and perform relevant operations in the database.
Creating a user and giving privileges for ORDS Access.
Open up a SQL worksheet on the Sql Developer app for the database. Right mouse click on the connection and choose Open Sql Worksheet to do this. In the blank worksheet you get you can type and execute sql queries and statements on the database for do DDL and DML operations. Lets run the below statement to create a user and grant the necessary privileges. After typing the queries execute those by selecting the queries and clicking on the green arrow icon as marked below.

Upon successful execution you can see the result in the bottom pane: Script Output.
In the above case I am creating a user called restuser and my password here is RESTservice123.
By creating the restuser and executing the GRANT TABLESPCACE statement a tables space to that user will be automatically created with the same user name and a quota is allocated to create tables in the database.
In the second statement i am granting connect privilege to the restuser. Why? Because when i am creating a table i am going to log in to the database again as the created user to create the tables that are used by my application in the newly created user’s table space. You can stay as an admin user and still create the new tables in the newly created users table space. But for this scope we are not going to cover how to do that and to make life simple let's go and create another database connection to the new user in the Oracle Sql Developer using the same cloud wallet file. Now the two connections would look like in the below screenshot. From now onward we will be using this database connection for all our database operations.

Creating a table and enable Oracle Rest Data Services and restrict the access to outsiders
Open up a new sql worksheet on the new connection and let's create a table called restdata which we are going to use to expose the data as a rest endpoint.

Above we created the table called restdata by logging in as the new user we created (restuser)
By doing that we created that table in the new users table space. In simple terms a table space is the allocated quota to a user in a database to create tables. We have granted unlimited tablespace for the restuser when we were creating the user in the beginning executing the below statement.
GRANT UNLIMITED TABLESPACE TO username ;
Okay. Now we need to tell Oracle that this created table and the users namespace should be enabled to work with the rest services. For that we need to restenable the table and the namespace. Run the following statement for that.

We are setting p_auto_rest_auth to FALSE in each of the two statements above. This is done to make sure that an unauthenticated client calls will not be answered by our endpoint. Each time the user needs to send a rest call the the endpoint, user needs to send credentials and authenticate the rest call before performing any operation with the database. Otherwise the server will responded with 401 Unauthenticated error.
Although above statements have restenabled the object and schema but we need to create a privilege to the table before we can do the rest calls.Execute the below statement to register that privilege for the table.

Replace the value for the l_patterns(1) with the table name like /restdata/* as above to be able for the rest privilege to identify the pattern when we are calling using our url. Later we will see that our rest api call will have the table name in the url and we are doing this here for the endpoint to understand if this table name comes in the url you have a request that makes sense and you can serve that request with this table's data. Don’t worry you will get to know about what this url and the format of the url when we talk about doing the rest call.
Now if you go and check the left panel and expand the Rest services section and expand privileges you should be able to see something like below. If you see the same you can assume that everything so far is done correctly.

Now we have all the privileges and restrictions set for the table and the table space (user)..
Configure the OAD for OAuth token based authentication
In this section we are going to see how we can enable a client to connect to the rest endpoint of our database table and consume rest services after authentication.
We will be using OAuth2 standard authenticaiton with client credentials grant type. What is OAuth2 and client credentials grant type?
There is a lot to learn if we talk about OAuth2 authentication. For now lets say its a mechanism or a standard way of implementing authentication for clients or websites to get access to a different API services offered by different servers. In our case it's the Oracle Autonomous database that offers rest data services as rest endpoints for our created tables on OAD.
In this section we are going to look at a more simpler way of token based authentication which is OAuth 2.0 Client Credentials Grant type which we use to get an access token before calling our rest database endpoint.
What is an access token?
A token or an access token is something like your boarding pass to a flight. When you are boarding to the flight you need to take it with you. Same way you need to send the access token to a server when you are sending whatever the request to get, update or delete data using rest api calls.
Also You need to provide your passport to get the boarding pass from the airport check in counter. Think of your passport as your client credentials. Exactly like you are issued a boarding pass when you provide a passport, when we use Grant Type as Client Credentials only when you provide your client credentials to the server you will be issued an access token from the server.
The boarding pass is only valid for some time; until your flight lands. Exactly in the same way access tokens also expires after some time. If you want to get an access token again you need to provide client credentials again to the server and get another access token for another limited amount of time.
Okay...In the above example i have mentioned about client credentials. What are those?
Think of them as a username and a password you use to log in to a website. Likewise client Credentials have two parts. A unique id that identifies the client, and a secret word that verifies the client. Those are called client id and client secret. How are we going to obtain these two for our Oracle Autonomous Database. For that we need to register a client in the OADB system. This is just like you sign up for a website with a user anime and a password. Only difference is that Oracle asks the information such as client name, email etc from us and it generates a client id and client secret for us. Let’s quickly see how we can register a client for ORDS access. Execute the below statement..

Note that you have to use p_grant_type as client_credentials in the above execution. There are several grant types used in OAuth authentication. This client credentials grant type simply tells Oracle system to grant an access token when we provide the client credentials; client id and client secret.
Most common and secure grant type is Authorization Code grant type where it uses an authorization code together with other credentials to obtain an access token. It has a more complex way of implementation and is more secure therefore It is the recommended grant type to use with authentication of websites and native apps when connecting to remote servers using API calls. I have not tried this grant type with Oracle Autonomous database yet but hoping to try that soon and write my experience on that in a separate article. For now let's look at the one we previously mentioned; Grant Type = Client credentials. You can read more about grant types in OAuth website here.
Now that we created the client and Oracle knows there's a client that would send a request to get or set data in the Autonomous Database. Still for that client to do any manipulation of data it needs to have a role assigned. The role for this is SQL Developer. One might think that we already have SQL Developer role assigned to the restuser we created. Yes, Still there is no user involvement when we send request from the client. Using this way you can have different clients created for a user and have different roles assigned to them.
To do this you need to execute the below statement.

Now the client registration process is all completed. We need to obtain the client id and client secret to be sent with the request in order to obtain the access token. The clients that we register are written to a database table with their generated ids and secrets. If we query that table we can find the client id and client secret that corresponds to our newly created client. Let's do it.

You can copy the returned values and save it in a safe place to be used later when the authentication request is being made to the server..
Now that all the server side configurations are done we only need to know the Oracle ORDS endpoint (URL) for our autonomous database to do the authentication REST call. To find that we need to go to the Autonomous Database again and click on the service console button.

Then in the service console click on the development link on the right side pane to show the development related options. In the window you get you can see a section called RESTful Services and SODA inside in a rectangle. In that you have your common base url for the services REST endpoint. Click on the copy button and get the url copied to the clipboard.

The common url looks like this.

The url we need to use to get an authentication token is slightly different than the base url. It infact has the base url as the starting url. You need to append your tablespace name to the base url andat last you need to append /oauth/token
The the access token url would look like below.

Additionally you need to send the grant type appended with a question mark at the end of the token url. The final url would look like below

Test the service using the Postman client
Let's test if we can get an access token by sending a post request to the above url with our client id and client secret. For that we i am going to use a free http client Postman.

As you can see I have done sent request as a POST request and used Basic Auth as the authentication type. I have used my client id and client secret as the username and password of the request. As the result, in the response body, I am getting back an access token from the Autonomous Database Server. Now using this access token I can request a resource (Request data in the created table) to get the data as a Json response.
Note that the token has an expiry value which denotes that you will not be able to use this token to make any request to the server after that specified time, in this case 3600 milliseconds.
Another thing to consider is that the Postman client automatically encodes these client id and client secret in base64 encoding and sends them to the server. Server only accepts the base64 encoded values. When I tried to send the request using a simple mobile app which i created using flutter, the request failed with the server error 401 and the issue was in the http package i used to do the request. These values were not automatically encoded to base64 in that package. When I explicitly encoded the values for base64 the request was accepted and successful. I had to use Fiddler to check both the request headers to identify this problem. It's good to remember fiddler as a useful tool for examining the requests and troubleshooting the problem.
We will talk about creating a simple test mobile app using flutter to have Oracle Autonomous Database as the back end in an upcoming post which we will be using Fiddler to intercept the rest call. For now you can google on how to use Fiddler.
Now let's look at how we are going to get the records of our table using this access token.
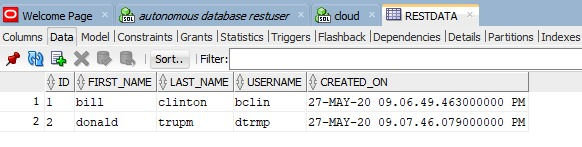
To do that first go to the Oracle Sql Developer client again and expand the tables section and add several rows to the created table. After adding two rows my table looked like this.
Now we need to know the endpoint to this table to do the request. How are we going to find the endpoint? Remember we got the common base url. We need to append the table space name and the table name at the end of it with a forward slash to the end. (forward slash it not needed when we query but it's always better to have it as we need it when writing data to the table using REST call)

We need to use the GET method to fetch data from a rest endpoint. Below is my Postman request passing the received auth token to get the data of the restdata table. Note that I have used bearer token as the authentication type and passed the obtained auth token in the previous request.

As the response I've got 2 rows which are in the database as a Json response. You can parse this response to be used in your client applications in any way accordingly.
Also like this way you can perform create, update and delete operations on the databse table we made restenable. You need to use POST method in requests with a correct Json request body to create records and need to use the PUT method to update the records with the correct keys in the request. That's about it...
To summarize, in this article we first provisioned an Oracle Autonomous Databse in the Oracle free tier
Then we connected to that database using Oracle SQL developer app as the admin user
The we created another user and gave privileges to that user and connected using the same user to the database
And using that new user then we created a table and made that table and table space restenable
We created a rest privilege to that table so that it can do rest call to that table endpoint,
Then we Registered a Rest Client and assigned Rest Privilege to that client in the same way to be able to connect to the Rest endpoints.
Then we looked at obtaining the client credentials of that client to be used in the authentication rest call to get an access token
We looked at how to perform the authentication rest client call and obtain the token using Postman http client
Finally we used the obtained access toke and did a GET request to the table Rest endpoint to get the data records in the table.
Hope you have gained a good understanding about how we can simply use an Oracle Autonomous Database as a remote back end for our applications and to access data on the DB easily using Oracle Rest Data Services.

Comments